Coconut Cake Recipe
Coconut cake is one of my favorite desserts that truly captures tropical flavors. I love how it combines creamy coconut milk, shredded coconut, and a luscious frosting. To make it, I mix flour, sugar, eggs, and butter, and then add the coconut goodness. After baking, I enjoy it fresh, often paired with berries or ice cream. Each slice is a delightful treat that brings health benefits too. Stick around, and I’ll share more tips on perfecting this delicious cake!
Contents
History
When I think about the history of coconut cake, I’m often reminded that its roots stretch back to the tropical regions where coconuts thrive. These versatile fruits have held immense cultural significance across various societies, from the lush landscapes of Southeast Asia to the Caribbean islands. The origins of coconut cake can be traced to these vibrant cultures, where coconuts symbolize hospitality and celebration. As I explore this delectable dessert’s evolution, I see how it transformed through migrations and culinary innovations, blending local flavors and techniques. Each bite of coconut cake tells a story, echoing traditions while inviting modern twists. It’s a delicious reminder of how food can bridge cultures and celebrate the rich heritage that coconuts bring to our tables.
Recipe
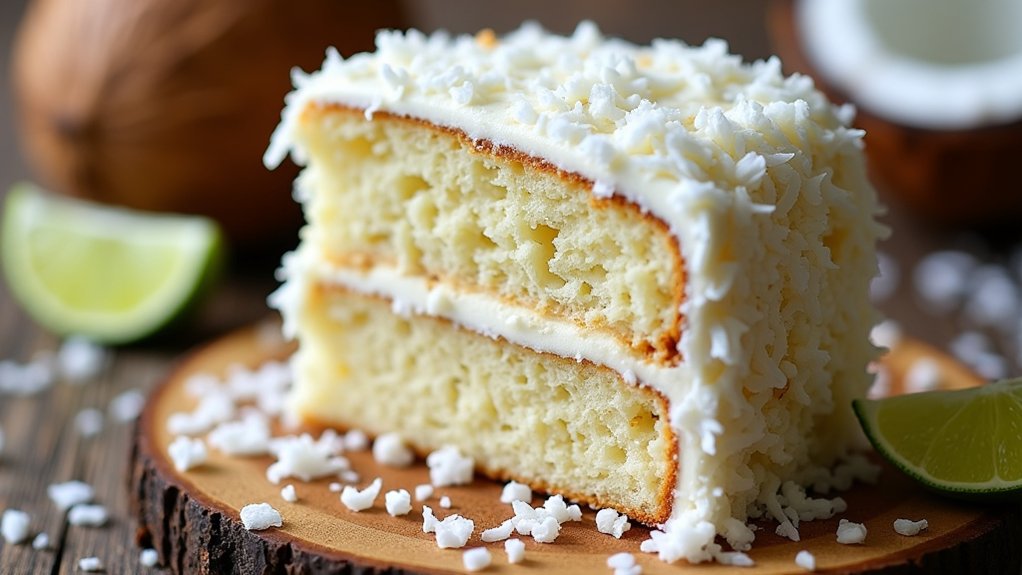
Coconut cake is a delightful dessert that captures the essence of tropical flavors in every bite. This moist and fluffy cake is made with coconut milk, shredded coconut, and a hint of vanilla, making it a perfect treat for special occasions or simply to satisfy your sweet tooth. The cake is often topped with a luscious coconut frosting that adds an extra layer of richness and sweetness, making it a favorite among coconut lovers.
Coconut cake embodies tropical bliss, combining moist layers with rich coconut frosting for an irresistible treat.
This recipe is straightforward and can be made in a few simple steps. Whether you’re an experienced baker or a novice in the kitchen, you’ll find that this coconut cake is easy to whip up and has a wonderful presentation. Pair it with fresh berries or a scoop of vanilla ice cream for an extra special dessert that’s sure to impress your guests.
Ingredients:
- 2 cups all-purpose flour
- 1 ½ cups granulated sugar
- ½ cup unsweetened shredded coconut
- ½ cup unsalted butter, softened
- 1 cup coconut milk
- 3 large eggs
- 1 tablespoon baking powder
- 1 teaspoon vanilla extract
- ½ teaspoon salt
- 1 cup powdered sugar (for frosting)
- ½ cup unsweetened shredded coconut (for frosting)
Cooking Instructions:
Preheat your oven to 350°F (175°C) and grease two 9-inch round cake pans. In a large mixing bowl, cream together the softened butter and granulated sugar until light and fluffy. Add the eggs one at a time, mixing well after each addition. Then, stir in the coconut milk and vanilla extract. In another bowl, combine the flour, baking powder, salt, and shredded coconut. Gradually add the dry ingredients to the wet mixture, mixing until just combined. Divide the batter evenly between the prepared pans and bake for 25-30 minutes or until a toothpick inserted into the center comes out clean. Allow the cakes to cool in the pans for 10 minutes before transferring them to a wire rack to cool completely.
Extra Tips:
For an added burst of coconut flavor, consider using coconut extract in addition to or instead of vanilla extract. To make the frosting even more decadent, you can use cream cheese or whipped cream combined with the powdered sugar and shredded coconut. For decoration, toast some extra shredded coconut in the oven for a few minutes until golden brown, and sprinkle it on top of the frosted cake. Store any leftovers in an airtight container at room temperature for up to three days, or refrigerate for longer freshness. Enjoy your homemade coconut cake!
Cooking Steps
Now that we have our ingredients ready, let’s get cooking! I always start by preheating my oven to 350°F, so it’s nice and hot when the cake goes in. Then, I mix the dry ingredients thoroughly before adding the wet ones gradually—this is where the magic begins!
Step 1. Preheat Oven to 350°F
Before diving into the delightful world of coconut cake, let’s get our oven ready. The first step is to preheat your oven to 350°F; this oven temperature is essential for achieving that perfect, moist texture we crave in a cake. While the oven warms up, I recommend checking your oven thermometer for accuracy—a common baking tip that can save you from potential baking disasters. A consistent temperature guarantees even baking, avoiding that dreaded dry or burnt edge. Once your oven beeps, you’ll feel the anticipation building! This simple yet important step is often overlooked, but it’s the foundation for your cake’s success. So, let’s embrace this moment and prepare for the magic that’s about to unfold.
Step 2. Mix Dry Ingredients Thoroughly
As I gather the ingredients for our coconut cake, mixing the dry components becomes essential to achieving that light, fluffy texture we all love. Selecting the right flour types—like cake flour or all-purpose flour—can make a significant difference. I prefer using a combination for ideal results. Here’s how I mix the dry ingredients:
- Measure the flour accurately; too much can weigh down the cake.
- Sift together the flour, baking powder, and salt to guarantee even distribution.
- Incorporate shredded coconut for that delicious tropical flavor.
- Use a whisk or fork to blend everything well, enhancing airiness.
These mixing techniques help create the perfect base for our coconut cake, guaranteeing each bite is a delightful experience!
Step 3. Add Wet Ingredients Gradually
To achieve a moist and flavorful coconut cake, I gradually add the wet ingredients to my dry mixture, allowing the flavors to meld beautifully. I start by pouring in the buttermilk and coconut milk, letting them cascade over the flour blend. Using a whisk, I gently stir, embracing the wet ingredient techniques that guarantee even distribution. This gradual incorporation prevents clumps and keeps the batter silky. I’ll often pause to scrape down the sides of the bowl, ensuring every speck of dry ingredients gets a taste of that luscious mix. It’s a dance of textures, each addition coaxing the batter into a creamy consistency. Trust me, this method elevates the cake to a whole new level of deliciousness!
Step 4. Fold in Coconut Flakes
Once the batter reaches that perfect creamy consistency, it’s time to fold in the coconut flakes. This is where the magic happens! I love exploring different coconut varieties, as each brings unique texture differences that elevate the cake. Here’s how to do it right:
- Choose your coconut: Toasted or unsweetened, both add depth.
- Gradually add: Carefully incorporate the flakes to maintain that airy texture.
- Gentle folding: Use a spatula to fold, avoiding overmixing.
- Visual check: Confirm the coconut is evenly distributed throughout the batter.
This step not only enhances flavor but also adds a delightful crunch. Once you’ve folded in those flakes, you’ll see the transformation, promising a cake that’s irresistibly rich and flavorful!
Step 5. Bake for 30 Minutes
With the batter now infused with those delightful coconut flakes, it’s time to bake! Preheat your oven to 350°F (175°C) and pour the batter into your prepared cake pans. This is where some essential baking techniques come into play; make sure to level the batter for even baking. I pop the pans in the oven and set the timer for 30 minutes. As the cake bakes, the aroma of coconut fills my kitchen, creating a mouthwatering anticipation. Once the timer goes off, I check for doneness with a toothpick— it should come out clean. After cooling, I can’t resist adding a creative twist with my favorite cake decoration. Get ready to impress with this luscious coconut masterpiece!
Nutritional Guide
When it comes to enjoying a slice of coconut cake, understanding its nutritional profile can enhance your experience. Coconut cake not only delights your taste buds but also offers some dietary benefits worth noting.
Here’s a quick look at its caloric content and nutritional highlights:
| Nutrient | Amount per Slice |
|---|---|
| Calories | 350 |
| Total Fat | 18g |
| Dietary Fiber | 2g |
Coconut adds healthy fats and fiber, which can aid digestion and provide sustained energy. Plus, the natural sweetness reduces the need for excessive sugar. So, indulge mindfully and enjoy the goodness of this delightful treat while appreciating its innovative nutritional aspects!
Final Thoughts
Savoring a slice of coconut cake is about more than just its delightful taste; it’s an experience that marries indulgence with nutritional awareness. The coconut benefits are numerous, from boosting heart health to providing essential nutrients. To elevate your baking, here are some quick tips:
Savoring coconut cake blends delightful taste with health benefits, making indulgence a nourishing experience.
- Use fresh coconut for a richer flavor.
- Incorporate coconut milk for moisture and creaminess.
- Experiment with textures by adding shredded coconut or coconut cream.
- Balance sweetness with a hint of salt to enhance flavors.
With these baking tips in mind, you’ll create a cake that’s not only delicious but also a nourishing treat. So go ahead, indulge yourself while savoring the goodness of coconut!
Frequently Asked Questions
Can I Use Unsweetened Coconut Instead of Sweetened?
I’ve used unsweetened coconut for its delightful texture. Just remember to adjust the sweetness with alternatives like honey or agave. It’ll create a unique flavor profile that’s both innovative and delicious in your dish!
How Can I Make the Cake Gluten-Free?
When I shifted to gluten-free baking, it felt like discovering a hidden path in a familiar forest. I’ve found great gluten-free alternatives like almond flour and tapioca starch—trust me, those baking tips can work wonders!
What Type of Coconut Milk Is Best?
When choosing coconut milk, I often prefer canned coconut for its rich, creamy texture. Look for full-fat varieties; they elevate dishes with their depth. Explore different coconut milk types to find your perfect match!
Can I Freeze Leftover Coconut Cake?
Absolutely, I freeze leftover coconut cake all the time! Just wrap it tightly in plastic, then foil. For best taste, label it with freezing tips. This storage method keeps it fresh and delicious for weeks!
How Long Does the Cake Stay Fresh?
How long does a cake stay fresh? I’ve found that proper cake storage keeps it delicious for about three to four days. For extra freshness tips, consider refrigerating or freezing slices for later enjoyment!
Conclusion
As I wrap up this delightful journey into coconut cake, I can’t help but think that a slice of this cake is like a hug on a plate. The moist layers, the sweet frosting, and the tropical essence come together to create pure bliss. Whether you’re baking for a special occasion or just treating yourself, this recipe is sure to be a hit. So, don’t hesitate—get your apron on and let the magic happen!


