Oreo Cake Recipe
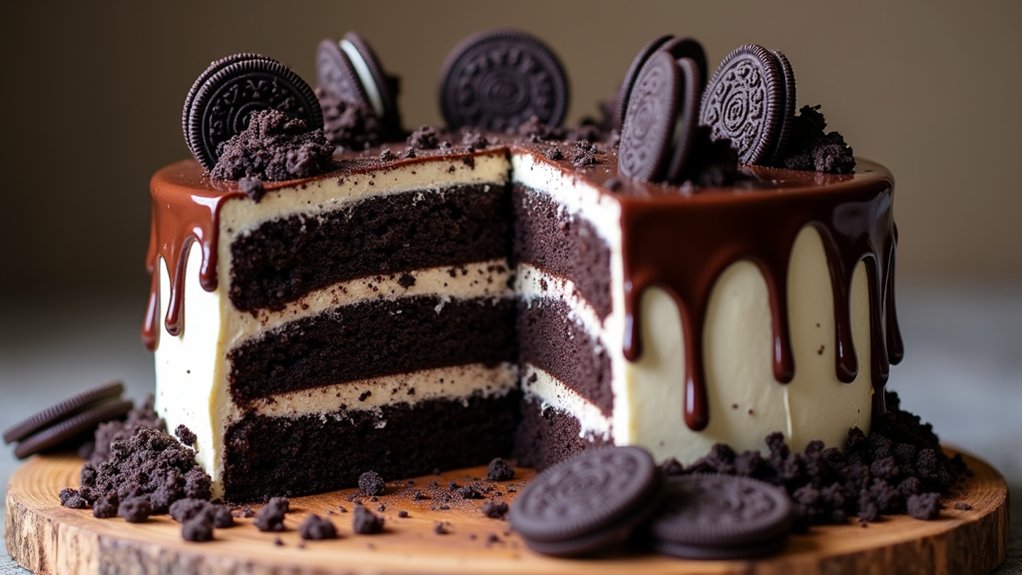
I’ve got a mouthwatering Oreo cake recipe that combines the rich, creamy flavors of Oreo cookies with a moist, fluffy cake. It features layers of chocolate cake and Oreo frosting, perfect for any occasion. You just need a few simple ingredients like flour, sugar, and crushed Oreos. The result is visually stunning and utterly delicious. Trust me, this cake is a crowd-pleaser! Stick around, and I’ll guide you through the cooking steps and more creative variations.
Contents
History
When I think about the history of the Oreo, I can’t help but marvel at its evolution from a simple chocolate and cream cookie to a beloved dessert staple. The Oreo’s origins trace back to 1912, when it first appeared in New York City, created by the Nabisco company. Initially, it was a modest offering, but its unique flavor and design sparked curiosity. Over the years, the cookie evolved, introducing variations like double-stuffed and seasonal flavors. Each innovation captured the hearts of cookie enthusiasts, transforming the Oreo into a cultural icon. Today, it’s not just a cookie; it’s a canvas for culinary creativity, inspiring countless recipes and desserts. The journey of the Oreo exemplifies how a classic can continually reinvent itself.
Recipe
Oreo cake is a delightful dessert that combines the rich, creamy flavors of classic Oreo cookies with a moist and fluffy cake. This indulgent treat is perfect for any occasion, whether you’re celebrating a birthday, hosting a gathering, or simply craving something sweet. With its layers of chocolate cake and Oreo frosting, this cake not only tastes amazing but also looks visually appealing, making it a favorite among both kids and adults alike.
Making an Oreo cake is surprisingly easy and can be accomplished in just a few simple steps. You’ll be amazed at how quickly you can whip up this decadent dessert with minimal effort. The key to achieving that signature Oreo flavor lies in both the cake batter and the frosting, which incorporates crushed Oreos. Follow this recipe for a delicious Oreo cake that will have everyone coming back for seconds!
Ingredients:
- 1 ½ cups all-purpose flour
- 1 cup granulated sugar
- ½ cup unsweetened cocoa powder
- 1 teaspoon baking powder
- 1 teaspoon baking soda
- ½ teaspoon salt
- 2 large eggs
- 1 cup whole milk
- ½ cup vegetable oil
- 2 teaspoons vanilla extract
- 1 cup boiling water
- 1 cup crushed Oreo cookies
- 1 cup unsalted butter (softened)
- 4 cups powdered sugar
- ½ cup heavy cream
- 1 teaspoon vanilla extract
- Additional whole Oreos for decoration
To create the Oreo cake, begin by preheating your oven to 350°F (175°C) and greasing two 9-inch round cake pans. In a large mixing bowl, combine the flour, sugar, cocoa powder, baking powder, baking soda, and salt. Mix well, then add the eggs, milk, vegetable oil, and vanilla extract, and beat on medium speed until smooth. Gradually stir in the boiling water until the batter is well combined and thin. Fold in the crushed Oreos, then evenly divide the batter between the prepared pans. Bake for 30-35 minutes or until a toothpick inserted in the center comes out clean. Allow the cakes to cool for 10 minutes before transferring them to wire racks to cool completely.
When it comes to assembling your Oreo cake, make a fluffy buttercream frosting by beating the softened butter until creamy, then gradually adding in the powdered sugar. Mix in the heavy cream and vanilla, and beat until fluffy. Once the cakes are completely cooled, place one layer on a serving plate and spread a generous amount of frosting on top. Place the second layer on top and frost the entire cake. For an extra touch, crumble more Oreos on top and around the sides of the cake for decoration. Finally, add some whole Oreos on top for an eye-catching finish.
For the best results, make sure your ingredients are at room temperature before starting the recipe. This will help the batter mix more easily and create a fluffier cake. If you want to enhance the Oreo flavor even more, consider adding a layer of crushed Oreos between the cake layers along with the frosting. Additionally, this cake can be made a day in advance and refrigerated, which allows the flavors to meld beautifully. Just remember to bring it back to room temperature before serving for the best taste!
Cooking Steps
Now that we’ve gathered all the ingredients, let’s get started on the cooking steps! I like to preheat my oven to 350°F first, so it’s nice and ready for our delicious cake. Once that’s sorted, I’ll crush the Oreo cookies finely, setting the stage for that rich, chocolatey flavor to shine through.
Step 1. Preheat Oven to 350°F
Before diving into the delicious world of baking an Oreo cake, let’s focus on an essential step: preheating your oven to 350°F. This vital oven temperature sets the stage for perfect baking, ensuring that your cake rises beautifully and bakes evenly. Here’s how to get it right:
- Turn on your oven: Simply twist the knob or press the button to start the preheating process.
- Set the temperature: Adjust it to 350°F; this is the sweet spot for many baking techniques.
- Wait patiently: Allow your oven to heat up fully—this usually takes about 10-15 minutes.
Once your oven signals it’s ready, you’re one step closer to creating that mouthwatering Oreo cake!
Step 2. Crush Oreo Cookies Finely
With the oven preheating to that perfect 350°F, it’s time to focus on the star of the show: the Oreo cookies. I love exploring different Oreo cookie varieties for this recipe, from classic to mint or even peanut butter. To achieve that perfect texture, I often use a few cookie crushing techniques. First, I place the cookies in a resealable plastic bag and use a rolling pin to smash them into fine crumbs—it’s satisfying and keeps the mess contained. Alternatively, I’ve found that pulsing them in a food processor delivers a more uniform crumb. Whichever method you choose, aim for a consistency that’s almost powdery, ensuring those flavors blend seamlessly into your cake. Let’s get crushing!
Step 3. Mix Ingredients Thoroughly
Combine the crushed Oreo cookies with your other ingredients to create a decadent batter that’s bursting with flavor. When it comes to mixing techniques, I’ve found that using a stand mixer or a hand whisk gives the best results. Pay attention to the ingredient ratios; the balance is key for that perfect texture. Here’s how I do it:
- Cream the butter and sugar until light and fluffy, ensuring even distribution of sweetness.
- Incorporate eggs one at a time, allowing each to blend in before adding the next for a smooth consistency.
- Gradually mix in dry ingredients, making sure there are no lumps, resulting in a silky batter perfect for baking.
Trust me, your Oreo cake will shine with this thorough mixing!
Step 4. Add Oreo Crumbs to Batter
Now it’s time to fold those delicious Oreo crumbs into the batter, elevating your cake to a whole new level of indulgence. I love using a mix of classic Oreo flavors, like original, mint, or even double-stuffed, to create a unique twist in each bite. Gently incorporate the crumbs, ensuring they’re evenly distributed without overmixing; that’ll keep your cake light and fluffy. A great baking tip is to reserve a handful of crumbs for garnishing the top later—it adds a delightful crunch and visual appeal. As you blend in those rich, chocolatey bits, you’ll start to see the batter transform into a heavenly concoction that promises to be a showstopper at any gathering. Enjoy the process!
Step 5. Bake for 30 Minutes
After folding in those delightful Oreo crumbs, it’s time to bring your cake to life in the oven. Preheat your oven to 350°F (175°C) and prepare to witness some magical baking techniques. As I gently pour the batter into the pan, I can already envision the perfect cake textures that await me.
- Place the pan in the center of the oven, allowing even heat distribution.
- Set a timer for 30 minutes, using this time to cleanse your kitchen of any floury chaos.
- As the timer ticks down, inhale the rich aroma of baking chocolate and creamy Oreos.
When the timer goes off, my heart races with excitement—it’s almost time to indulge in this decadent creation!
Nutritional Guide
While indulging in a slice of Oreo cake can be a delightful experience, it’s essential to contemplate the nutritional aspects that come with this sweet treat. I know you’re curious about the health benefits and calorie count, so let’s break it down!
Here’s a quick nutritional guide:
| Nutrient | Per Slice (1/12 of cake) | Daily Value (%) |
|---|---|---|
| Calories | 350 | 17 |
| Sugar | 25g | 28 |
| Protein | 4g | 8 |
Keep in mind that while this cake is indulgent, it can be enjoyed in moderation. Balance is key, so savor each bite while being aware of these nutritional insights!
Final Thoughts
As you prepare to indulge in a slice of Oreo cake, it’s worth reflecting on the delightful balance between indulgence and moderation. This cake isn’t just a treat; it’s a canvas for creativity. Consider these cake variations to elevate your dessert experience:
- Chocolate Ganache Layer – A rich, silky finish that complements the Oreos perfectly.
- Mint Infusion – Add a rejuvenating twist with mint extract for a cool surprise.
- Oreo Crust – Swap out traditional cake layers for a crunchy Oreo crust that adds texture.
For serving suggestions, try pairing it with a scoop of vanilla ice cream or a dollop of whipped cream. Each bite captures joy, so enjoy every moment while savoring this decadent creation!
Frequently Asked Questions
Can I Use Gluten-Free Oreos for This Recipe?
I’ve tried gluten-free Oreos in various recipes, and they work surprisingly well. If you’re exploring Oreo alternatives, these cookies can elevate your gluten-free baking while still delivering that delicious, creamy flavor everyone loves.
How Long Does Leftover Oreo Cake Last?
Leftover Oreo cake lasts about three to four days in the fridge. For ideal freshness, I recommend storing it in an airtight container. This simple tip keeps the cake moist and delicious for your next indulgence!
What Can I Substitute for Eggs in This Recipe?
If you’re looking for egg alternatives, I’ve found that mashed bananas or applesauce work great in baking. These options add moisture and sweetness, transforming your dish into something innovative and delicious. Trust me, you’ll love it!
Can I Freeze the Oreo Cake?
I’ve found freezing tips work wonders for preserving cake. Just wrap it tightly in plastic wrap, use airtight storage methods, and it’ll stay delicious for up to three months. Enjoy that delightful dessert later!
How Can I Decorate the Oreo Cake Creatively?
I love decorating my Oreo cake with an Oreo theme! I use crushed Oreos, edible decorations like chocolate sprinkles, and even mini Oreo cookies on top. It’s a fun way to make it visually irresistible!
Conclusion
So, there you have it—a decadent Oreo cake that’s somehow both a delightful treat and a guilty pleasure. Isn’t it ironic how something so indulgent can bring back memories of childhood simplicity? Each bite is like a time machine, transporting me to carefree days spent savoring cookies with friends. As you take your first forkful, remember: you’re not just enjoying cake; you’re reliving those sweet moments, one Oreo crumb at a time. Enjoy every delicious second!
