Pumpernickel Bread Recipe
I love making pumpernickel bread with its rich, earthy flavor and outstanding health benefits! To whip it up, you’ll need coarsely ground rye flour, bread flour, cocoa powder, and coffee granules, among other ingredients. The process involves mixing, kneading, and letting the dough rise before baking it to perfection. Each loaf is a nourishing treat that pairs wonderfully with soups and salads. Curious about its history and why it’s so nutritious? There’s so much more to discover!
Contents
History
When I explore the history of pumpernickel bread, I can’t help but be fascinated by its origins. This hearty bread hails from Germany, where it’s crafted from coarsely ground rye flour. The name “pumpernickel” itself has a whimsical ring, believed to derive from a German dialect term meaning “devil’s fart.” Despite its quirky name, pumpernickel holds significant cultural importance—it was a staple for peasants, providing sustenance during harsh winters. As I dig deeper, I find that its dense, slightly sweet flavor symbolizes resilience and resourcefulness. Today, pumpernickel transcends its humble beginnings, inspiring innovative culinary creations that pay homage to its rich heritage. It’s thrilling to see how this traditional bread continues to evolve while retaining its cultural significance.
Recipe
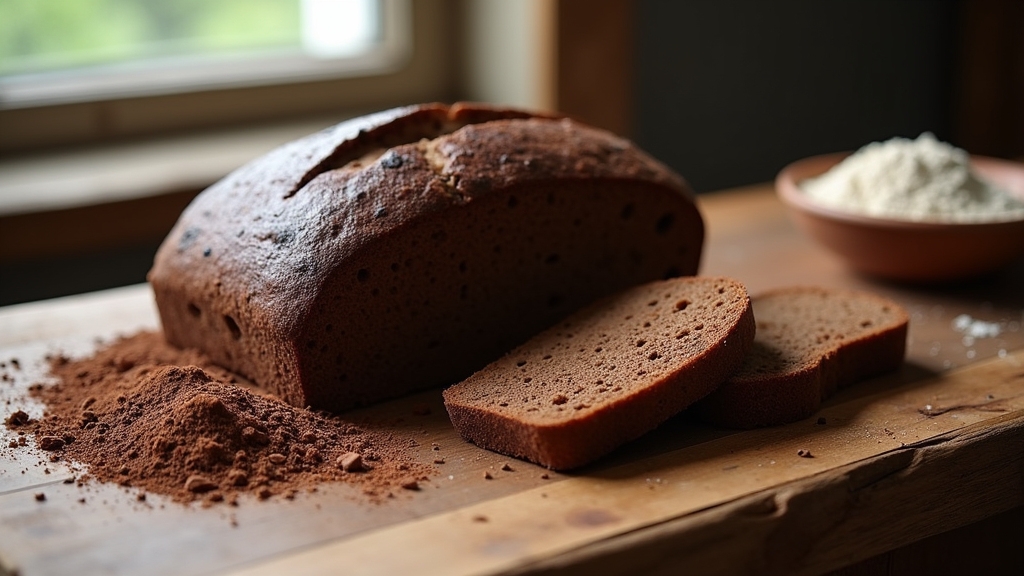
Pumpernickel bread is a hearty and flavorful bread that originates from Germany. It is distinguished by its dark color and rich taste, which comes from the use of coarsely ground rye flour and a long, slow baking process. This bread is not only delicious but also packed with nutrients, making it a healthy choice for sandwiches or as an accompaniment to soups and salads. The unique flavor profile of pumpernickel bread can enhance a variety of dishes, and it’s an excellent option for those who enjoy experimenting with different types of bread.
Pumpernickel bread offers a rich, dark flavor and nutritious benefits, making it a delightful addition to any meal.
Making pumpernickel bread at home can be a rewarding experience. The process may take some time, but the result is worth the effort. The bread has a dense texture and a slightly sweet, nutty flavor that pairs beautifully with toppings like cream cheese, smoked salmon, or avocado. Whether you’re enjoying it for breakfast, lunch, or dinner, homemade pumpernickel bread is sure to impress your family and friends.
Ingredients:
- 2 cups coarsely ground rye flour
- 1 cup bread flour
- 1 tablespoon cocoa powder
- 1 tablespoon instant coffee granules
- 1 tablespoon brown sugar
- 1 teaspoon salt
- 1 tablespoon caraway seeds (optional)
- 1 ½ cups warm water (about 110°F)
- 2 teaspoons active dry yeast
- 1 tablespoon vegetable oil
- 1 tablespoon vinegar
Cooking Instructions:
In a large mixing bowl, combine the warm water and active dry yeast; let it sit for about 5 minutes until frothy. Add the rye flour, bread flour, cocoa powder, coffee granules, brown sugar, salt, caraway seeds, vegetable oil, and vinegar to the yeast mixture. Stir until a sticky dough forms. Knead the dough on a floured surface for about 8-10 minutes until smooth and elastic. Place the dough in a greased bowl, cover it with a damp cloth, and let it rise in a warm place for about 1-2 hours or until doubled in size. Once risen, punch down the dough, shape it into a loaf, and place it in a greased loaf pan. Allow it to rise again for about 30-45 minutes. Preheat your oven to 350°F (175°C) and bake the bread for about 35-40 minutes or until it sounds hollow when tapped. Let it cool on a wire rack before slicing.
Extra Tips:
For the best flavor, consider using freshly ground rye flour if possible. Additionally, you can enhance the bread’s texture by incorporating seeds such as sunflower or pumpkin seeds into the dough. If you prefer a sweeter bread, feel free to increase the amount of brown sugar. Always check the internal temperature of the bread; it should be around 190°F (88°C) when done. Finally, pumpernickel bread can be stored in an airtight container at room temperature for a few days or frozen for longer preservation. Enjoy your homemade pumpernickel bread!
Cooking Steps
Now that we’ve gathered all our ingredients, it’s time to get our hands doughy and start the cooking steps. I’ll guide you through measuring the flour accurately, adding the rye flour gradually, and kneading the dough until it’s smooth and elastic. By the end of this process, we’ll have perfectly shaped loaves ready for their rise!
Step 1. Measure the Flour Accurately
Accurate flour measurement is essential for achieving the perfect pumpernickel bread. I’ve learned that using precise measuring techniques can transform my baking experience. Instead of scooping flour directly from the bag, I spoon it into a measuring cup and level it off with a straight edge. This guarantees I’m not adding excess flour, which can lead to dense bread. When selecting flour types, I always opt for a blend of whole wheat and dark rye, as they contribute to the bread’s rich flavor and texture. Remember, consistency is key. Experimenting with different measuring techniques can yield delightful results. So, take your time and measure carefully; your pumpernickel will thank you with every flavorful bite!
Step 2. Add Rye Flour Gradually
With all that flour measured and ready, it’s time to incorporate the rye flour into the mix. I start with a small bowl, adding a cup of rye flour to my all-purpose flour blend. Gradual addition is key here; I sprinkle it in slowly, allowing each bit to fully integrate before adding more. This technique prevents clumping and guarantees a smoother texture. I can almost feel the dough transforming with each addition, becoming richer and darker. As I mix, I watch the color deepen, a sign that the flavor profile is evolving beautifully. It’s a tactile experience, and I relish in the anticipation of that earthy, nutty flavor that rye flour brings to my pumpernickel masterpiece.
Step 3. Knead the Dough Thoroughly
Kneading the dough thoroughly is where the magic truly happens. I find it fascinating how this step transforms a sticky mixture into a smooth, elastic dough. I start by using my palms, pushing down and folding the dough over itself, employing different kneading techniques to guarantee even consistency. I can feel the dough changing, becoming more cohesive and less tacky with each motion. It’s essential to knead for at least 10 minutes, checking the dough’s consistency along the way. It should spring back when poked, indicating it’s ready for the next stage. This tactile experience not only engages my senses but also cultivates a deep appreciation for the artistry of baking. Trust me, the effort pays off in flavor and texture!
Step 4. Let Dough Rise Completely
After kneading, the next crucial step in crafting pumpernickel bread is letting the dough rise completely. This is where the magic of dough fermentation happens. I place my dough in a warm, draft-free area, covered with a damp cloth, allowing the yeast activity to work its wonders. As the minutes pass, I watch the dough expand, growing in size and developing that rich, complex flavor we crave. The longer it ferments, the more depth it gains, so I resist the urge to rush this process. You’ll notice the surface becomes slightly puffy, indicating it’s ready. This critical step not only enhances the taste but also guarantees a delightful texture—so don’t skip it! Your pumpernickel will thank you later.
Step 5. Shape the Dough Into Loaves
Now it’s time to transform that beautifully risen dough into loaves. I gently punch down the dough to release the air, then divide it into equal portions, depending on the loaf types I want to create. For traditional loaves, I shape each portion into a smooth rectangle, folding the edges inwards before rolling it tightly. If I’m feeling adventurous, I might create a round boule, tucking the dough underneath to form a lovely round shape. Each technique in dough shaping offers unique textures and crusts, enhancing the pumpernickel’s rich flavor. After shaping, I place the loaves into greased pans, allowing them to rise again. It’s a thrilling step that sets the stage for the delicious baking ahead!
Nutritional Guide
When it comes to enjoying pumpernickel bread, understanding its nutritional profile can enhance your appreciation for this hearty loaf. Packed with fiber, this bread offers a myriad of health benefits, making it a superior choice compared to white bread.
Here’s a quick ingredient comparison to illustrate its advantages:
| Nutrient | Pumpernickel Bread | White Bread | Whole Wheat Bread |
|---|---|---|---|
| Fiber (grams) | 5.0 | 1.0 | 2.5 |
| Protein (grams) | 3.5 | 2.0 | 3.0 |
| Iron (%DV) | 10% | 3% | 6% |
Choosing pumpernickel not only satisfies your taste buds but also supports your health goals. So, why not indulge in its rich flavor while boosting your nutrition?
Final Thoughts
Savoring the rich, earthy flavor of pumpernickel bread is not just a treat for the palate; it’s also a step towards healthier eating. I’ve found that experimenting with different baking tips can elevate your pumpernickel experience. For instance, consider adding caraway seeds or sunflower seeds for unique flavor variations that surprise the taste buds. Don’t hesitate to tweak the recipe by incorporating whole grains or even experimenting with sweeteners like honey for a hint of sweetness. Each loaf you create can tell a different story, reflecting your culinary creativity. With practice, you’ll master the art of pumpernickel baking, bringing joy and health to your table. So, roll up your sleeves and plunge into this delicious journey!
Frequently Asked Questions
Can I Substitute Whole Wheat Flour for Rye Flour?
I’ve tried substituting whole wheat flour for rye, and while it changes the flour texture and flavor profile, it’s a fun experiment! Just be ready for a different taste and denser consistency in your baking.
How Long Does Pumpernickel Bread Last?
Pumpernickel bread’s shelf life feels like it could last forever! Proper storage tips can keep it fresh for about a week at room temperature or up to three months in the freezer. Enjoy every slice!
Is Pumpernickel Bread Gluten-Free?
I’ve found that traditional pumpernickel bread isn’t gluten-free, as it typically contains wheat flour. However, innovative gluten-free alternatives exist, using alternative pumpernickel ingredients like buckwheat or rye flour, offering a delicious twist for those avoiding gluten.
Can I Make Pumpernickel Bread Without a Bread Machine?
Making pumpernickel bread without a bread machine is like painting a masterpiece by hand. I’ve found that traditional baking methods, combined with clever pumpernickel preparation tips, can yield delicious results and foster creativity in the kitchen.
What Are Common Toppings for Pumpernickel Bread?
When I enjoy pumpernickel sandwiches, I love topping them with creamy spreads like herbed cream cheese or tangy hummus. They elevate the flavor and make each bite a delightful experience, perfect for any occasion!
Conclusion
As I pulled my warm, crusty pumpernickel bread from the oven, the rich, earthy aroma wrapped around me like a cozy blanket. It reminded me of the first time I tasted this delightful bread at a quaint café, where the owner shared stories of its ancient roots. Now, with a slice slathered in butter, I can’t help but feel a connection to that moment. I hope you enjoy baking this bread as much as I did—it’s a delicious journey worth taking!
