Red Velvet Cake Recipe Easy
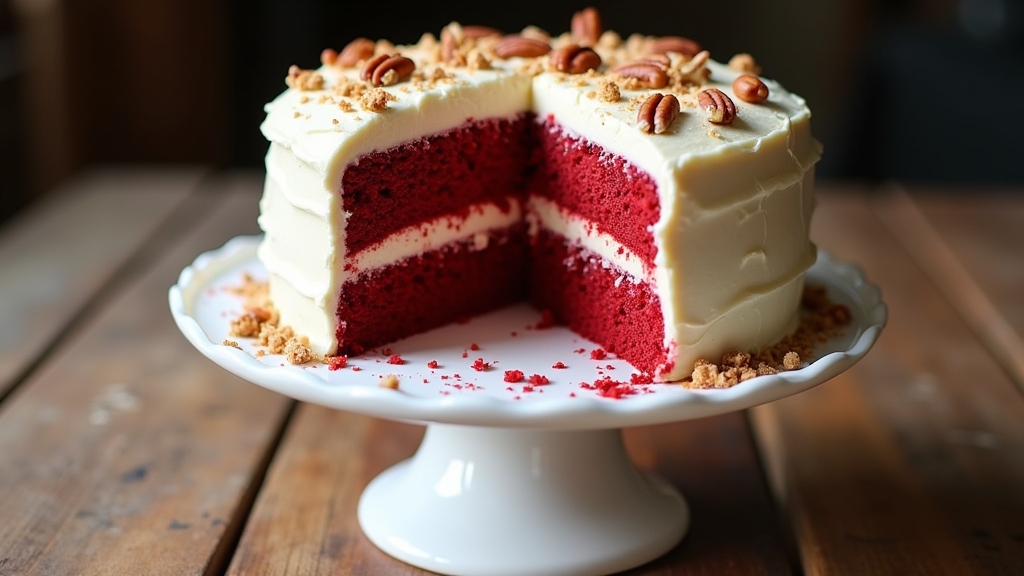
If you’re looking for an easy red velvet cake recipe, you’re in for a treat! I love how its rich flavor blends cocoa with buttermilk, creating that signature velvety texture. Simply mix flour, sugar, baking soda, cocoa powder, and salt, then combine with vegetable oil, buttermilk, eggs, and red food coloring. Bake until perfectly moist and top with cream cheese frosting for that classic touch. Stick around for more tips and variations to elevate your baking game!
Contents
History
Red Velvet Cake has a rich and fascinating history that tantalizes the taste buds and sparks curiosity. Originating in the South, this cake embodies a culinary evolution that reflects both tradition and innovation. The deep red hue, once attributed to cocoa powder reactions, gained popularity during the 1920s, thanks to its striking appearance. As I explore its Southern origins, I’m captivated by tales of velvet cakes dating back to the Victorian era, where they were celebrated for their unique texture. Over time, bakers experimented, adding buttermilk and vinegar, which transformed the cake into the moist delight we recognize today. Each bite carries a piece of history, blending Southern charm with creative flair—a true reflection of our culinary journey.
Recipe
Red velvet cake is a classic dessert that combines a rich, velvety texture with a striking red hue, making it a favorite for special occasions and celebrations. Its unique flavor comes from a subtle blend of cocoa powder, buttermilk, and a hint of vinegar, which not only enhances the cake’s taste but also contributes to its moistness. Traditionally paired with a luscious cream cheese frosting, red velvet cake is both a feast for the eyes and the palate, leaving a lasting impression on anyone lucky enough to indulge in a slice.
Making a red velvet cake at home is easier than you might think. With a few simple ingredients and steps, you can create a beautifully layered cake that rivals anything from your favorite bakery. Whether you’re baking for a birthday, an anniversary, or just a weekend treat, this recipe will guide you through the process, ensuring your cake turns out perfectly every time.
Ingredients:
- 2 ½ cups all-purpose flour
- 1 ½ cups granulated sugar
- 1 tsp baking soda
- 1 tsp salt
- 1 tsp cocoa powder
- 1 ½ cups vegetable oil
- 1 cup buttermilk, room temperature
- 2 large eggs, room temperature
- 2 tbsp red food coloring
- 1 tsp vanilla extract
- 1 tsp white vinegar
Instructions:
Preheat your oven to 350°F (175°C) and grease and flour two 9-inch round cake pans. In a large mixing bowl, sift together the flour, sugar, baking soda, salt, and cocoa powder. In a separate bowl, whisk together the vegetable oil, buttermilk, eggs, red food coloring, vanilla extract, and vinegar until well combined. Gradually add the wet ingredients to the dry ingredients, mixing until just combined and smooth. Divide the batter evenly between the prepared pans and bake for 25-30 minutes or until a toothpick inserted in the center comes out clean. Allow the cakes to cool in the pans for 10 minutes before transferring them to wire racks to cool completely.
Extra Tips:
For the best results, make sure all your ingredients are at room temperature before you start baking, as this helps create a smoother batter. If you want a more intense red color, feel free to add more food coloring; just be cautious not to overdo it. Additionally, for an extra layer of flavor, consider adding a teaspoon of almond extract to the batter. When frosting your cake, make sure it is completely cool to prevent the cream cheese frosting from melting. Finally, if you’re not serving the cake right away, store it in an airtight container to keep it moist and fresh.
Cooking Steps
Now that we have our ingredients ready, let’s get started on the cooking steps that’ll bring our red velvet cake to life. First, I’ll preheat the oven to 350°F, setting the stage for that perfect bake. Then, I’ll mix the dry ingredients thoroughly to guarantee every bite is full of flavor and texture.
Step 1. Preheat Oven to 350°F
Before diving into mixing the ingredients, I always find it essential to preheat the oven to 350°F. Setting the oven temperature properly is an important baking tip that can make or break your red velvet cake. As the oven warms up, the heat creates the perfect environment for the cake to rise and develop that light, fluffy texture we all love. I usually take this time to gather my ingredients and prepare my baking pans, making certain everything’s ready when I’m done mixing. Remember, patience is key; a properly preheated oven guarantees even baking, allowing those vibrant red hues to shine through. So, don’t skip this step—your cake deserves it!
Step 2. Mix Dry Ingredients Thoroughly
To create a perfectly balanced red velvet cake, mixing the dry ingredients thoroughly is vital. I start by measuring my flour, cocoa powder, and baking soda with precision, paying close attention to those ingredient ratios. Using a whisk, I employ simple mixing techniques to guarantee that everything blends seamlessly. This step is essential; it prevents clumps and assures that the cocoa is evenly distributed throughout the flour. I also add a pinch of salt to enhance the flavors, making sure every bite is delectable. As I combine these dry ingredients, I imagine the rich, velvety texture they’ll create once baked. Taking this time to mix thoroughly sets the foundation for an exquisite cake that’s sure to impress!
Step 3. Combine Wet Ingredients Well
After ensuring your dry ingredients are perfectly mixed, it’s time to bring the wet ingredients together for that luscious red velvet cake base. I usually start by whisking together the eggs, buttermilk, vegetable oil, and vanilla extract in a large bowl. The key here is to use effective mixing techniques; I like to incorporate the ingredients until they’re smooth, ensuring no lumps remain. This not only blends the flavors beautifully, but it also creates a moist texture that’s essential for red velvet cake. You might even consider using an electric mixer for a fluffier consistency. Remember, the more thoroughly you combine these wet ingredients, the better your cake will rise and taste, setting you up for that delightful baking experience!
Step 4. Add Food Coloring Gradually
Adding food coloring is an essential step that transforms your cake from ordinary to extraordinary. I always start by choosing a high-quality gel or liquid food coloring; the color intensity is key for that signature red velvet hue. With my mixing bowl ready, I add the coloring gradually, starting with just a few drops. This way, I can control the depth of color as I mix. It’s amazing to watch the batter evolve from a pale beige to a vibrant crimson! I recommend stopping occasionally to check the shade; you can always add more if needed, but it’s tough to lighten it once it’s too dark. This careful, gradual addition guarantees my cake will look as stunning as it tastes!
Step 5. Fold in Dry Ingredients
Now, it’s time to gently fold in the dry ingredients to create that perfect batter. I start by sifting the flour, cocoa powder, and baking soda together, ensuring there are no lumps. Using a spatula, I scoop the dry mix from the bottom of the bowl, lifting it over the wet ingredients. This folding method is essential; it keeps the batter light and airy. I focus on incorporating the ingredients without overmixing, as that can lead to a dense cake. I love experimenting with dry ingredient techniques, like adding a pinch of salt to enhance the flavors. Once I see no streaks of flour, I know I’ve achieved a beautifully blended batter, ready for the next step in our red velvet journey!
Nutritional Guide
While indulging in a slice of red velvet cake can be a delightful experience, it’s essential to contemplate the nutritional aspects of this beloved dessert. Understanding its caloric content and ingredient benefits can help you enjoy it mindfully.
Here’s a quick nutritional guide to keep you informed:
| Nutrient | Amount per Slice (1/12 of cake) |
|---|---|
| Calories | 320 |
| Total Fat | 16g |
| Carbohydrates | 43g |
| Protein | 4g |
| Sugar | 25g |
Red velvet cake’s unique combination of cocoa and buttermilk can offer some health benefits, like antioxidants and probiotics. So, when you savor that slice, you can appreciate both the taste and the nutrition!
Final Thoughts
As I reflect on the joy that a slice of red velvet cake brings, it’s clear that this dessert is more than just a treat—it’s a celebration of flavors and traditions. Whether I’m baking for a special occasion or just indulging on a quiet afternoon, these moments are truly delightful. Here are some baking tips and flavor variations to elevate your red velvet experience:
- Experiment with extracts: Add almond or coconut extracts for a unique twist.
- Swap the frosting: Try cream cheese, ganache, or even whipped cream for different textures.
- Incorporate spices: A hint of cinnamon or nutmeg can add warmth.
- Add zest: Lemon or orange zest brightens the flavor profile.
With each bite, I’m reminded of the creativity and love that goes into baking!
Frequently Asked Questions
Can I Use a Different Type of Flour for This Recipe?
I’ve experimented with gluten-free flour and whole wheat flour in various recipes. Both can work, but the texture and flavor might change. I recommend adjusting liquids to achieve the perfect consistency for your creation.
How Can I Make a Vegan Version of Red Velvet Cake?
For a vibrant vegan version, I’d swap eggs with applesauce or flaxseed, and use almond milk. Don’t forget plant-based frosting made from coconut cream—it’s deliciously dreamy and decadently rich. Let’s create something scrumptious!
What Is the Best Way to Store Leftover Red Velvet Cake?
To store leftover cake, I always use proper refrigeration. I place it in an airtight container to keep it moist and fresh. This way, I can enjoy those delicious flavors for days without worry!
Can I Freeze Red Velvet Cake for Later Use?
Absolutely, I freeze my leftover cake all the time! For great results, follow these freezing tips: wrap it tightly, then during the thawing process, let it sit in the fridge overnight for the best texture.
What Are Some Popular Frosting Options for Red Velvet Cake?
When it comes to frosting options, I love pairing red velvet cake with rich cream cheese or fluffy buttercream. Both add a delicious contrast, elevating the cake’s flavors while keeping it irresistibly moist and delightful.
Conclusion
To sum up, making a red velvet cake is not just about indulging in a delicious treat; it’s also a delightful journey through history and flavor. Did you know that red velvet cake gained popularity during the Great Depression, with its vibrant color brightening up the tough times? So, whether it’s for a celebration or just a sweet craving, this easy recipe will surely impress. Grab your apron and let the baking adventure begin—your taste buds will thank you!
